3D Print
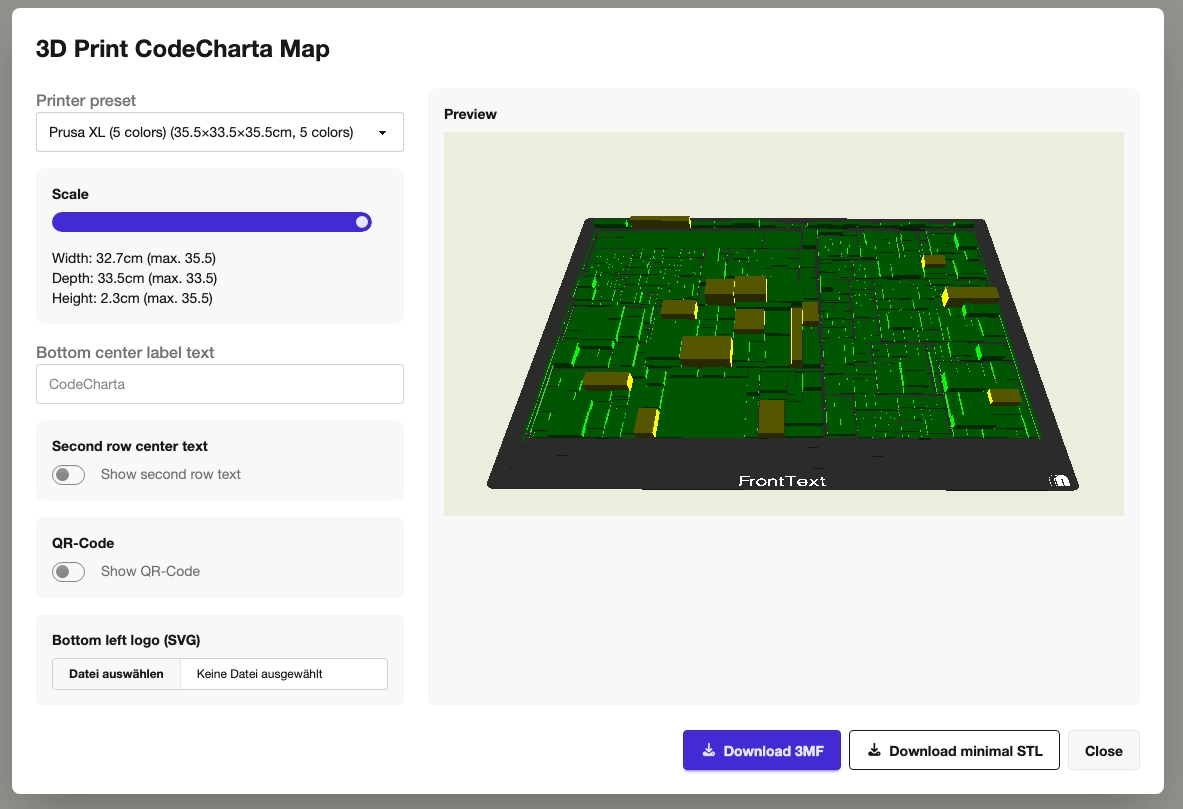
The 3D Print action in the top-right navigation exports the map that is currently on screen as a physical, printable model. Selecting it opens the 3D Print CodeCharta Map dialog, where you configure the printer, the model size and the labels, watch a live preview, and then download the model as a 3MF or STL file.
The export always uses the map exactly as it looks in the scene: the same area, height and color metrics, the same color range, and the same blacklist. Adjust those in the main view before opening this dialog.
Printer preset
Section titled “Printer preset”The Printer preset dropdown picks the target printer. Each preset defines the build volume and the number of colors (extruders/filaments) the printer can handle. The available presets are:
- Prusa MK3S (single color) — build volume 24.5 × 20.5 × 20.5 cm, 1 color
- BambuLab A1 + AMS Lite — build volume 25.1 × 25.1 × 25.1 cm, 4 colors
- Prusa XL (5 colors) — build volume 35.5 × 33.5 × 35.5 cm, 5 colors (default)
The preset constrains the export in two ways:
- The build volume caps how large the model can be scaled (see Scale). Changing the preset re-fits the map to the new maximum size.
- The number of colors determines how many distinct color shades the color metric is quantized into. A single-color preset prints a one-color model; a multi-color preset splits the model into that many color volumes so a multi-material printer can assign each a different filament.
The Scale slider sets the model size. Below the slider the resulting
Width, Depth and Height are shown in centimeters, each with the maximum
allowed for the selected printer in parentheses (for example Width: 32.7cm (max. 35.5)).
Width is the value you drive directly; depth and height follow from the map’s proportions plus the front label and base plate. The slider’s upper bound is the largest size that still fits inside the selected printer’s build volume, so you cannot scale the model beyond what the printer can produce. Switching presets recomputes this maximum and re-fits the map.
Labels & QR code
Section titled “Labels & QR code”These controls add text and graphics to the front edge and base plate of the model. All of them update the preview immediately.
- Bottom center label text — a single-line text rendered across the front of the
base plate (shown as “FrontText” in the preview). It is empty by default, with
CodeChartashown as placeholder text. - Second row center text — toggle Show second row text to print a second line below the main label. When enabled, an input lets you edit it; it defaults to the current date.
- QR-Code — toggle Show QR-Code to emboss a QR code onto the base plate. When enabled, an input lets you set the encoded URL (it defaults to a maibornwolff.de link). The QR code needs enough surface area, so at very small scales it may be hidden automatically even when the toggle is on.
- Bottom left logo (SVG) — upload your own logo via the file picker (SVG only). Once a file is selected, additional controls appear to Remove, Rotate and Flip the logo and to change its Color.
Downloading
Section titled “Downloading”Two download formats are offered, plus Close to dismiss the dialog without exporting. The file name is derived from the loaded map’s name.
- Download 3MF — the full, print-ready model. The 3MF package keeps the model split into per-color volumes and maps each color to a separate extruder, so a multi-material printer (per the selected preset) prints the map in its CodeCharta colors. It is bundled in the PrusaSlicer/Slic3r 3MF layout (model, model config and content-type metadata), making it the recommended format for actually printing the map.
- Download minimal STL — a binary STL of the bare map geometry only. STL carries no color or multi-material information, so this is a single-body, “minimal” model. Use it when you only need the shape (single-color print, further editing in CAD, or sharing the geometry) and don’t need the per-color split.